Thursday, January 28, 2010

Charting Marianne Kinzel's "Ladybird" pattern

The "Ladybird Stitch" from Marianne Kinzel's lace knitting books has long interested me. Scroll down to Figure 6 in this embedded excerpt from The First Book of Modern Lace Knitting to see a picture of the fabric:
I have found it useful in graphing my own patterns to sometimes represent groups of stitches that usually are shown as several symbols as one symbol. This has helped me, for example, to un­der­stand better the stitch structure of the “Ladybird” pat­tern. If you replace the “yo, k1-b, yo” group with a single symbol, it makes for a more compact chart that more clearly shows the proportions of the knitted piece. 
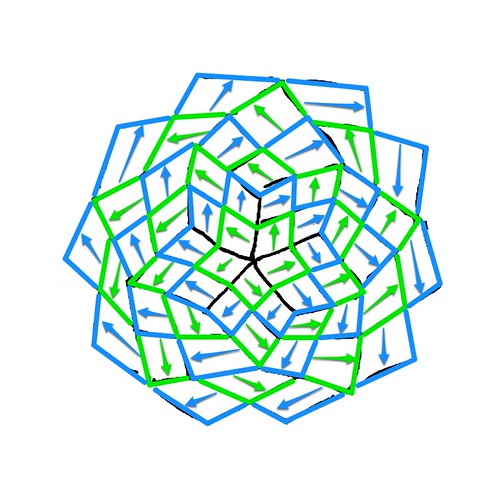
Here’s a graph of the ladybird mesh to show what I mean (edge stitches aren’t graphed correctly):


A full repeat of the ladybird pattern (shown on the graph inside the heavy lines) when knitted really is approxi­mately square. And using the  “yo, k1-b, yo” symbol means that the placement of the yarnover symbols in the chart more accurately represents what is going on in the knitted piece. The “yo, k1-b, yo” group is approximately equal in size to the single yarnovers since the latter are strained horizontally by the sudden decrease in stitches on the rows in which they appear.

Here’s the same pattern when graphed as Kinzel does it in her Modern Lace Knitting books:


Done this way, there’s no way to tell from the graph that the yarn overs form 45˚ diagonals in the knitted piece, or that the proportions of the pattern when knitted are square, roughly the same as garter stitch (one stitch = two rows), though much less dense a fabric! The graph may be a little easier to read, but that is a matter of taste, I think. And on patterns like this one, where the stitch count changes from row to row, one square in the graph can’t equal one stitch. Mrs. Kinzel uses blank squares to address the imbalance.


More of my idiosyncratic charting style here:


Lace  knitting chartImage by fuzzyjay via Flickr
Reblog this post [with Zemanta]

Wednesday, January 27, 2010

Varying the ribbed-entrelac hat

In the previous post, I described how I diagrammed the ribbed-entrelac hat, showing you the steps involved in figuring out how to knit an entrelac piece with a continuous piece of yarn.
For that hat, I used an entrelac square that was 15 stitches wide, in a ribbing formed with (k5, p5, k5, p5, k5). Each square is 15 stitches wide and 31 or 32 rows long.
Recently, I designed a fabric that uses 6-stitch, 13-or-14-row squares. Each square is ribbing with 3 knits and 3 purls. The squares come together in such a way that the fabric is reversible, and the knits and purls create a hound's-tooth check. I'm pretty happy with the way the fabric came out, and now I want to use it in a garment. I figure I can adapt the entrelac-ribbing hat I just made to use this fabric.
I can make the reversible hound's-tooth check entrelac with any square that is half-knit, half-purl ribbing. So, if I chose to, I could just use the same diagram I used for the first hat, and use (k7, p7) or (k8, p8) for the squares. But that would make the symmetry of the hound's-tooth motifs too hard to see (except in a larger garment like a sweater).
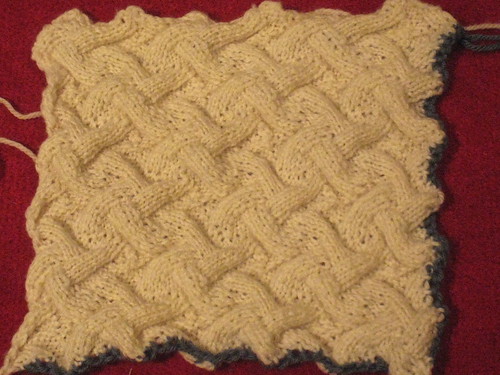
Reversible  "Hound's-Tooth" Ribbed Entrelac
I decided that I would rather use k4, p4 ribbing, which would mean I could subdivide the squares in the first diagram and get approximately the same shape and size of the first hat. Four of the new squares will fit in each of the squares in the first diagram, like so:

Next, following the same procedure as the previous post, I take this diagram and indicate the grain of the knitting for each square.
That ends up looking like this:

Next, I figure out what order to knit the squares in and how the yarn travels from square to square.
I used Skitch to overlay arrows and colored lines on the last diagram, to show the "rings" of squares that I will knit to create the hat. The inner ring is green, next ring is blue, then green, etc., alternating outward. The colors only serve to distinguish the "rings." I don't intend them to represent colors on the finished piece.
One thing I didn't realize until I finished the diagram is that, while coloring the outer edges of each ring with the same color as the arrows that show the direction of knitting, I leave some edges uncolored. These edges only show up on "increase" rings, and if you count the edges they tell you how many more squares there are on this ring than the previous one.
For example from ring 0 (nothing, the very beginning) to ring 1, there is an increase of 5 squares (from 0 to 5). From ring 1 to ring 2 there is another increase of 5 squares (from 5 to 10). From then on, there are no more increases, and each subsequent ring is 10 squares. What this means is that once I finish ring 4, I can keep repeating rings 3 and 4 indefinitely to make the hat as long as I want.

entrelac hat subdivided

Reblog this post [with Zemanta]

Tuesday, January 26, 2010

Diagramming and Designing an entrelac piece

In this post and the next, I want to describe the process I go through before I cast on an entrelac piece, how I figure out the way the entrelac squares have to go together to create the shape I want, in such a way that I can knit the piece continuously with one length of yarn.

To join entrelac squares in such a way that the fabric is reversible is a topic for another post. In this one I'll describe how I make diagrams that show me how and in what order to knit the entrelac squares.

For the Ribbed-Entrelac hat, I figured that I would do five squares at the crown. I probably could have done four squares, but I figured 5 would be more interesting. First diagram is here:

This diagram shows the crown of the hat at the center, and the hat stretched out flat. Each of the 4-sided shapes in the diagram is a square in real life, well, an entrelac square made of ribbing, so not really a square, but square enough.

Once I have the squares plotted out, the next thing to do is to show the grain of the knitting. In entrelac, squares that are next to each other have the direction of the knitting at right angles. So, I indicate the grain of the knitting with a straight line that goes through the center of the square(ish) parallel to the direction of knitting. Like this:
 
Next, I need to figure out the order of knitting the squares and the direction of knitting each square. Over the years and with much practice, I can sort of visualize what direction to knit the squares. I start in the center of the diagram and knit one "ring" of squares at a time, and change direction between rings. In this case the inner ring is 5 squares knit in the counterclockwise direction, surrounded by a ring of squares knit clockwise, then counterclockwise again, like so:

Next, I figure out what order to knit the squares in, and indicate the order with numbers on the squares. I place a number in the corner of the square where the yarn enters the square and I place a dot right inside the corner where the yarn leaves the square.

Knitting squares 1-5 is pretty straightforward. Where to place square 6 is the first decision point. It could have gone between squares 1 and 5 rather than as shown, between 5 and 4. The reason I chose it the way I did is related to the way I'm joining the squares (a topic for another post.)

Note that each square except the last in each ring has an odd number of rows, starting on a right-side row and ending on a wrong-side row (for the counter clockwise rings), or the reverse (for the counter-clockwise rings). The last square in a round has an extra row, to double back and start the next ring of squares going in the opposite direction.

Here's the first ring of squares knitted out, and next the first two rings:

Image by fuzzyjay via Flickr
Next time: how I converted this pattern so that each square is replaced by four smaller squares.
Reblog this post [with Zemanta]

Saturday, January 23, 2010

Reversible Ribbed Entrelac Fabric


Reversible Ribbed Entrelac, originally uploaded by fuzzyjay.

Each entrelac square is 6 stitches wide and 12 or 13 rows tall. The rows are 3 knit, 3 purl or 3 purl, three knit. The reverse side is a mirror image of this side.

Wednesday, January 13, 2010

Nico wearing the pentacle hat

Here's a picture of my nephew Nico wearing the rounded-pentacle hat. He's so cute. You can't see the pentacle detail on the crown, but hey, this is one adorable kid.

nico in hat


Reblog this post [with Zemanta]
Related Posts Plugin for WordPress, Blogger...