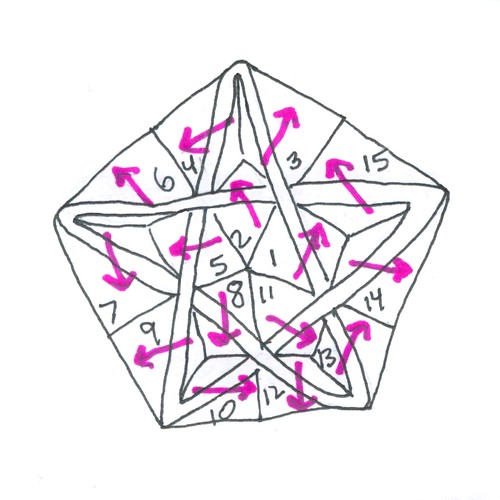
This diagram shows that it's possible to knit a pentacle that appears to be a continuous cable. Whether the fabric is lumpy and ugly because of the disposition of the entrelac squares remains to be determined. This could be used for the crown of a hat.
Wednesday, October 28, 2009
Tuesday, October 27, 2009
Cabled Entrelac Ball III
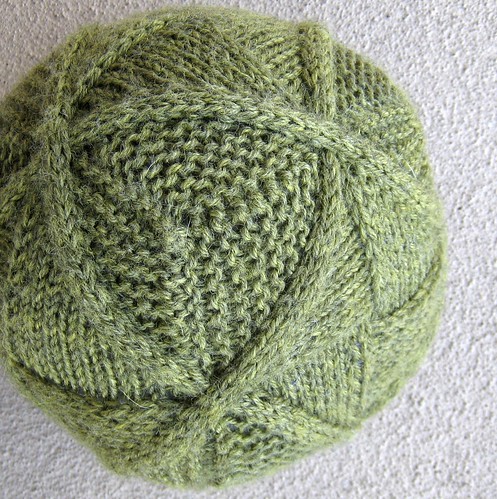
Now we are two! (I gave up on the second one.) I have lots to fix in the diagrams. This is why test-knitting is important!
Sunday, October 25, 2009
12 of 24
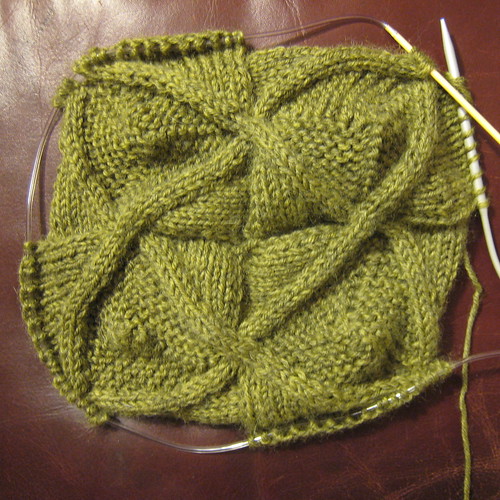
Half of the squares are done now for the 24-square cabled entrelac cube. I hope the cable crossings will straighten out as the ball is stuffed with fiberfill.
Friday, October 23, 2009
24-square cabled entrelac cube, detailed charts

This document is a draft of charted instructions for knitting a cabled entrelac cube with 24 squares. I haven't knitted from these charts, so there may be some errors. I'm providing this for anybody who would like to attempt the knitting. I will help if you get stuck... hopefully by the time you get to the sticking point I will have already knitted past you.
ETA: I found an error in the chart, the symbol for Purl 2 together (on right-side rows) is actually only used on wrong-side rows. Oops.
Wednesday, October 21, 2009
First 4 squares
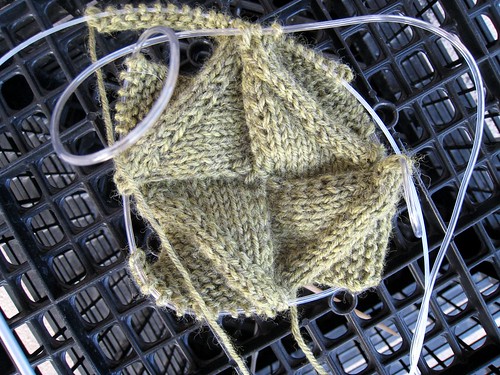
I'm starting to create the detailed diagrams for my popular "Cabled entrelac cube." Eventually, I'll sell the pattern on Ravelry (and here.)
Thursday, October 08, 2009
dy/dan » Blog Archive » You Have No Life
It's so obvious to me that the kind of person who would create a cocktail-mixer from balsa wood and twine is simply blowing off steam that life will eventually focus in a direction that will be extremely a) constructive, b) profitable, or c) both. I can't make this obvious to my students. After six years I lack a succinct, meaningful response to my students' defensive, clannish embrace of mediocrity, though I'm grateful for this tweet, which comes pretty close:
dwineman: You say "looks like somebody has too much time on their hands" but all I hear is "I'm sad because I don't know what creativity feels like."
via blog.mrmeyer.com
Love this tweet.
Friday, October 02, 2009
Picking up and knitting from a cast-on edge
I invented a new (to me) method for working from the bottom, cast-on, edge of a knitted piece. It has one advantage over the previous method I'd been using, which was to unravel a provisional cast-on and put the freed loops on a needle and start knitting from that.
The advantage of the new method is that there is no half-stitch jog between the columns of stitches on the two pieces of knitting, even though the pieces are knitted in opposite directions.
In a way, this method is similar to a three-needle bind-off, in reverse.
What you will need: the needles you are using for your project, plus a double-pointed needle a few sizes smaller than the other needles. Some waste yarn in the same weight as the main yarn, and slippery yarn is better, since you have to pick out a row of stitches at the end.
Here are the steps:
- Cast on, with waste yarn, the number of stitches you are using for the piece.
- Knit a few rows in waste yarn. End on a wrong-side row. Break off waste yarn, leaving about a 6-inch/30-cm tail.
- With the main yarn, knit a row. Tie the ends of the waste yarn and main yarn together with a bow knot or just an overhand knot, loosely.
- With the main yarn, knit a row through the back loops. This is important! The stitches from the previous row must be twisted. (Not with each other, but each stitch itself must be crossed.) The piece should look something like the picture below:
- Continue on with the piece. See below:
- Work up to the point where you want to start knitting from the cast-on edge.
- Using a separate, smaller, double-pointed needle, pick up the upper purl bumps of the garter ridge. In progress:
- Complete. You should have the same number of stitches on the needle as you cast on:
- Twirl the piece 180 degrees and start knitting from the other direction. Here it is after a few rows:
- This is how it looks from the wrong side:
- After you've knitted a few rows in the other direction, you can remove the waste yarn. Untie the knot that joins the waste yarn and main yarn, and pull the end through the stitches of the first row of main yarn. Here's how it looks from the back with the waste-yarn piece removed:
- And from the front:


Please give these directions a try, and let me know how I could improve them.
I want to try this for the fingers of color-work gloves knitted from the tips of the fingers, because this is a way you could get the stitches to form continuous stripes over the finger-tips. Also, you could use this for a toe-up sock in color stripes, since this lets the stripes line up over the toe. I haven't figured out how to use this as a start for circular knitting, but I don't see any reason why I couldn't make it work.
Subscribe to:
Posts (Atom)