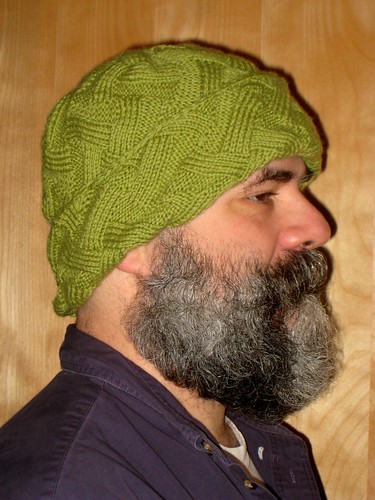
Even more exciting to me is that I have successfully taught this pattern and its associated techniques to a pal from Thursday night's knitting group at Knit Purl in Portland. We have met three times, and each time Lori has gone home and practiced the techniques of the entrelac join and returned to the next meeting with some great samples. The last time we met, she had an almost-finished hat and I showed her how to finish the hat with an i-cord border.
Next time I see her, I hope to be able to post pictures of her wearing her hat! Hers is a variation on the other hats I've done. So, there are 4 hats in existence now that use ribbed entrelac squares according to the general plan of the first one (using a long, circular needle):
- Work five squares attached to each other counter-clockwise as follows:
- Cast on enough stitches for a square using scrap yarn.
- Work square 1. Leave the last, right-side row on the right needle. Do not turn the work.
- Pick up and work the stitches for the first row of the next square along the left selvedge of the square just completed. Work the next square, ending with a right-side row. Leave the last row of stitches for the square just completed on the right needle.
- Repeat step 2 for squares 3 and 4.
- For square 5, pick up and work stitches along the side of 4. Then, remove the scrap yarn from the cast-on edge of square 1. This will give you loops to put on the left needle. *Pull a loop from the next stitch on the left needle (from the cast on edge of 1) and use that loop to work the next 2 rows of square 5. Repeat from * until all stitches from the cast-on edge are used up. Work one more row, ending with a wrong-side row. Do not turn the work.
- Work a ring of 5 squares clockwise, attached to the first 5 as follows:
- Pick up and work the first (wrong-side) row of the next square from the right selvedge of the previous square. *Pull a loop from the next stitch on the left needle (from the stitches of a square in the previous ring of squares) and use it to work the next two rows of the current square. Repeat from * until all stitches from the previous ring's square are used up, ending with a wrong-side row. Leave the last row of stitches for the square just completed on the right needle.
- Repeat the previous step for squares 7-10, ending square 10 with one extra (right-side) row. Do not turn the work.
- Work a ring of 5 squares counter-clockwise, attached to the previous 5 as follows:
- Pick up and work the first (
wrongright-side) row of the next square from the left selvedge ofthea previous square. *Pull a loop from the next stitch on the left needle (from the stitches of a square in the previous ring of squares) and use loop to work the next two rows of the current square. Repeat from * until all stitches from the previous ring's square are used up, ending with awrongright-side row. Leave the last row of stitches for the square just completed on the right needle. - Repeat the previous step for the next 4 squares, ending the last square of the ring with one extra (wrong-side) row. Do not turn the work.
- Repeat steps 2.1, 2.2, 3.1 and 3.2 as desired, to make the hat as long as you like. I did five and a half rings for the Ribbed Entrelac Hat II, and four and a half (not counting mistakes) for the REH I.
- When the hat is long enough, finish with five entrelac triangles edged with i-cord as follows:
- Cast on three stitches with backward loops.
- Pick up and work the first row of the triangle from the free selvedge of the previous square. *Pull a loop from the next stitch on the left needle and use the loop to work two rows as follows:
- Work to the last 4 stitches, then k2together, k2 (the last three stitches are i-cord).
- Slip 3 wyif, work to end of row.
- Repeat from * until there are three stitches left on the needle.
- Repeat steps 2 and 3 until all five triangles are done. Graft the three stitches that remain to the three stitches that were cast on for the i-cord.
Here's a diagram of the first 4 rings of entrelac squares. The crown of the hat is in the middle of the diagram, and the squares are shown distorted, as they would look if the hat were squashed flat. I explain what the arrows, numerals, and dots mean in a previous post, Diagramming and Designing an Entrelac Piece:
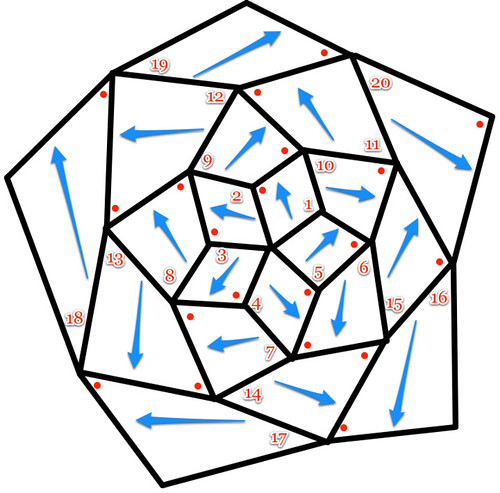
2010-12-13 Edited to correct and clarify the connections between rings of squares.
![Reblog this post [with Zemanta]](http://img.zemanta.com/reblog_e.png?x-id=c667abd5-d969-4922-aeed-3a4713c954db)
I am wondering if I could make a blanket using this technique. If I added a stitch to the number of picked up stitches with each subsequent round of squares, would it lay flat, as opposed to shaping to go around a head? Thank you for your creative thinking!
ReplyDeleteI am trying to follow this, and I don't get this part: " *Pull a loop from the next stitch on the left needle (from the cast on edge of 1) and use that loop to work the next 2 rows of square 5. Repeat from * until all stitches from the cast-on edge are used up." I would love some clarification. Thank you for all your inspiring work. I love your blog.
ReplyDeleteHello Morgaine, thanks for your query. I am (eventually) going to do a video to describe the process. I have been procrastinating that for a couple of years now. If I write something up to (better) describe the process I'll contact you.
ReplyDeleteHello Kelly, I am thinking that you might do better to use a pattern that lies flat using the same number of stitches per square, but your concept sounds like it would be pretty. My problem is I don't know how to figure out the number of stitches you would need to lie flat. I suppose one way to go about that would be to draw out the pattern (it would look sort of like the spirals that sunflower seed heads make) and measure the squares that result. You could use the ratio of the lengths of the squares to figure out the number of stitches to use. The problem with that plan is that if the numbers don't work out, it's a hella lot of knitting to rip out.
ReplyDelete