Sunday, February 28, 2010

Entrelac joins comparison swatch

These photos show a swatch with two different entrelac joins.

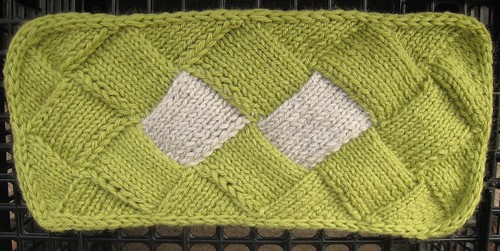
On the left of the swatch (the right when flipped over) is the usual method of slipping the first stitch in every row of each entrelac square. Stitches for new squares are picked up from behind the slipped stitches. The squares are joined along their selvedges by working a stitch together with a live stitch from a previous square (on the left selvedge by ssk and on the right selvedge by p2tog).

On the right is the new method I've developed (not entirely original). For the squares on the right, the first stitch in each row is worked. Stitches for new squares in this method are picked up from the thread between the last stitch of a row and the first stitch of the next row (the turning thread). Squares are joined not by decreasing but by pulling loops from live stitches of a previous square and using that loop to knit two rows of the new square.

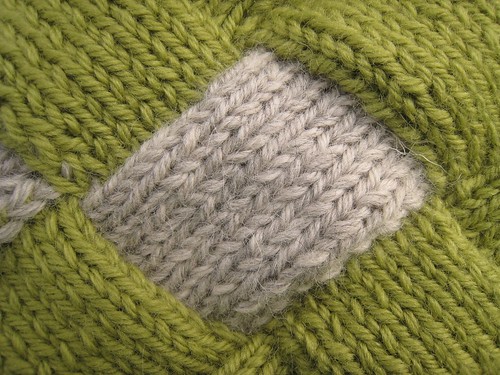
One advantage of the new method is apparent in the close-up pictures. There is no "grinning"-through (an industrial-knitting term) of the other color along the selvedges of the entrelac square.

Another thing to note about this swatch: The new joining method produces slightly bigger squares, since there is less overlap between adjacent squares. That is, the squares are no bigger, but the fabric produced is slightly bigger because of less overlap.


Entrelac joins comparison swatch - 1

Entrelac joins comparison swatch - 2

Entrelac joins comparison swatch - 3

Entrelac joins comparison swatch - 4
Below, I show the two sides of the swatch before blocking:

Entrelac join comparison swatch, unblocked

Entrelac join comparison swatch, unblocked

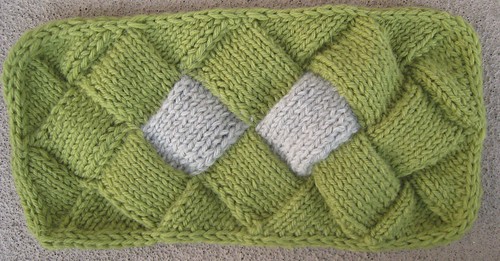
Notice how the new method produces entrelac fabric that has much higher relief. The fabric becomes much flatter with blocking.

I'm going to illustrate the two components of the new entrelac join (picking up from the turning thread, and the loop selvedge-join) in a later post.
Reblog this post [with Zemanta]

Friday, February 26, 2010

Four entrelac hats


Four hats, originally uploaded by fuzzyjay.
These are the last four hats that I designed and knit. They are meant to be worn with the brim folded up, either inside or outside, for more ear-warmness. To that end, the fabric is reversible. The red patch on the first hat looks better on the other side, since the red-green join is less speckled on that side.

Thursday, February 18, 2010

YAREH! Yet another ribbed-entrelac hat

Lori made herself a ribbed entrelac hat using the techniques I taught her. It's her own design, though it shares an affinity with the other hats I made with this technique. Like the others, it's seamless, reversible and knit in one piece. I guess seamless implies one-piece... well, maybe not, since Elizabeth Zimmerman's sweater designs are often seamless but not made in one piece. Here she is, modeling it at Knit Purl's Thursday night Sip 'n' Stitch:
Lori's Ribbed Entrelac HatLori's Ribbed Entrelac Hat


Lori's Ribbed Entrelac Hat

I am such a proud "uncle"! Now Lori says she'll write up a pattern for this that I can edit. I hope we can then teach a class at a local yarn store.


Reblog this post [with Zemanta]

Wednesday, February 17, 2010

Random time, plus another Ribbed-Entrelac Hat

I finished the third entrelac hat made up of ribbed squares. I like this one a lot, and I'm happy with the way it came out, even though there are a number of small errors in the i-cord edging.

Ribbed Entrelac Hat III

Even more exciting to me is that I have successfully taught this pattern and its associated techniques to a pal from Thursday night's knitting group at Knit Purl in Portland. We have met three times, and each time Lori has gone home and practiced the techniques of the entrelac join and returned to the next meeting with some great samples. The last time we met, she had an almost-finished hat and I showed her how to finish the hat with an i-cord border.

Next time I see her, I hope to be able to post pictures of her wearing her hat! Hers is a variation on the other hats I've done. So, there are 4 hats in existence now that use ribbed entrelac squares according to the general plan of the first one (using a long, circular needle):
  1. Work five squares attached to each other counter-clockwise as follows:
    1. Cast on enough stitches for a square using scrap yarn.
    2. Work square 1. Leave the last, right-side row on the right needle. Do not turn the work.
    3. Pick up and work the stitches for the first row of the next square along the left selvedge of the square just completed. Work the next square, ending with a right-side row. Leave the last row of stitches for the square just completed on the right needle.
    4. Repeat step 2 for squares 3 and 4.
    5. For square 5, pick up and work stitches along the side of 4. Then, remove the scrap yarn from the cast-on edge of square 1. This will give you loops to put on the left needle. *Pull a loop from the next stitch on the left needle (from the cast on edge of 1) and use that loop to work the next 2 rows of square 5. Repeat from * until all stitches from the cast-on edge are used up. Work one more row, ending with a wrong-side row. Do not turn the work.
  2. Work a ring of 5 squares clockwise, attached to the first 5 as follows:
    1. Pick up and work the first (wrong-side) row of the next square from the right selvedge of the previous square. *Pull a loop from the next stitch on the left needle (from the stitches of a square in the previous ring of squares) and use it to work the next two rows of the current square. Repeat from * until all stitches from the previous ring's square are used up, ending with a wrong-side row. Leave the last row of stitches for the square just completed on the right needle.
    2. Repeat the previous step for squares 7-10, ending square 10 with one extra (right-side) row. Do not turn the work.
  3. Work a ring of 5 squares counter-clockwise, attached to the previous 5 as follows:
    1. Pick up and work the first (wrong right-side) row of the next square from the left selvedge of the a previous square. *Pull a loop from the next stitch on the left needle (from the stitches of a square in the previous ring of squares) and use loop to work the next two rows of the current square. Repeat from * until all stitches from the previous ring's square are used up, ending with a wrong right-side row. Leave the last row of stitches for the square just completed on the right needle.
    2. Repeat the previous step for the next 4 squares, ending the last square of the ring with one extra (wrong-side) row. Do not turn the work.
  4. Repeat steps 2.1, 2.2, 3.1 and 3.2 as desired, to make the hat as long as you like. I did five and a half rings for the Ribbed Entrelac Hat II, and four and a half (not counting mistakes) for the REH I.
  5. When the hat is long enough, finish with five entrelac triangles edged with i-cord as follows:
    1. Cast on three stitches with backward loops.
    2. Pick up and work the first row of the triangle from the free selvedge of the previous square. *Pull a loop from the next stitch on the left needle and use the loop to work two rows as follows:
      1. Work to the last 4 stitches, then k2together, k2 (the last three stitches are i-cord).
      2. Slip 3 wyif, work to end of row.
    3. Repeat from * until there are three stitches left on the needle.
    4. Repeat steps 2 and 3 until all five triangles are done. Graft the three stitches that remain to the three stitches that were cast on for the i-cord.
I realize that these directions are sketchy at best. The technique for picking up and working stitches from the selvedges of previous entrelac units I leave for a later post. I'm thinking I need to record a video to fully explain it. Lori has mastered the particular pick-up technique I use, so I have hope that I'll be able to teach it to others.

Here's a diagram of the first 4 rings of entrelac squares. The crown of the hat is in the middle of the diagram, and the squares are shown distorted, as they would look if the hat were squashed flat. I explain what the arrows, numerals, and dots mean in a previous post, Diagramming and Designing an Entrelac Piece:

20-square hat diagram
2010-12-13 Edited to correct and clarify the connections between rings of squares.

Reblog this post [with Zemanta]

Monday, February 08, 2010

Entrelac Star


This would be nice as a decoration made of cotton and starched. The example is knit of worsted-weight acrylic. I don't really recommend acrylic for this. The tips of the star tend to twist, and it's easier to block cotton or wool.

Preliminaries

Materials and tools: a small quantity of yarn, with circular knitting needle and crochet hook to suit. A length of smooth, contrasting-color yarn. For the example, 8 inches (20 cm.) is about right.

Right Twist (RT): Knit 2 together, leaving stitches on left needle, then knit the first stitch again and drop the two stitches off the left needle.

You will be knitting five units. The second unit is picked up from the left edge of the first unit, the third from the fourth, and the fourth from the third. The fifth unit is picked up from the left edge of the fourth unit and its own left edge is joined to the cast-on edge of the first unit. The star is finished with a crochet border.

Ignore the brackets if you are knitting a star the same size as the example. The algebra contained within brackets is only useful if you want to make a smaller or larger star. The base number can be any odd number n >= 7. The example uses 11 for n.
Cast on 12 [n+1] stitches.

Unit 1

Row 1: (Right side) *YO, RT, K2 [(n-7)/2], K2tog, rep from *.
Row 2: Lay a contrasting piece of yarn from back to front over working yarn, purl to end of row.
Rows 3, 5, ..., 21 [2n-1]: Repeat row 1.
Rows 4, 6, ..., 20 [2n-2]: Repeat row 2.

Leave the last row (21 [2n-1]) on the right needle.

Sanity check: there are 11 [
n] lace eyelet holes going up the center of the unit. There are 10 [n-1] loops being held by the contrasting-color yarn.

Units 2-4

Pick up loops held by contrasting yarn onto left needle, from the previous unit's left edge, starting from the bottom left to the top left corner. Remove the contrasting yarn, and use it while turning the rows for this unit.

Row 1: (Right side) *YO, RT, K3 [(n-7)/2 + 1], rep from *.
Rows 2-21 [2n-1]: as for Unit 1.

Leave the last row (21 [2n-1]) on the right needle.

Unit 5

Unpick the cast-on and place the freed-up stitches on the left needle, so that the right side of the first unit is facing you (you start picking up loops from the lower-right corner of the unit toward the lower-left corner). There should be 11 [n] stitches on the left needle. Then with the left needle pick up stitches held by the contrasting yarn. There should now be 21 [2n-1] loops on the left needle.
 
Row 1: YO, RT, K3 [(n-7)/2 +1], YO, RT, K2, SSK, turn.
Row 2: Purl.
Row 3: YO, RT, K2 [(n-7)/2], K2tog, YO, RT, K2
[(n-7)/2], Sl2, K1, PSSO (central double-decrease).
Rows 4, 6, ... 20 [2n-2]: Repeat row 2.
Rows 5, 7... 21 [2n-1]: Repeat row 3.

Leave the last row (21 [2n-1]) on the right needle.

Finishing

Crochet *chain 1, single-crochet in a stitch or yarn-over loop, repeat from * in each stitch or loop around the star. When you get to the inner corners, gather three stitches/loops together into one sc. Finish with a slip stitch into the first single crochet. Block flat.

PDF link

Download this pattern as a PDF formatted for printing.


Reblog this post [with Zemanta]

"Walkerized" decreases

Barbara Walker started the whole thing when she changed slip-one-knit-one-pass-slip-stitch-over (sl1-k1-psso) to slip-slip-knit (ssk). Did you know that most decreases can be modified in a simi­lar way? 

For example, the most common way to do a double decrease when you want the decrease to slant gently to the right is “ssk, return the stitch thus formed to the left-hand needle, then pass the next unworked stitch over the stitch just worked, then pass the just-worked stitch again to the right-hand needle.” A Walker-style modification of that de­crease would be as follows. “Slip two stitches separately as if to knit.[1] Insert the left-hand needle into both stitches togeth­er from the right and transfer them back to the left hand needle.[2] Then knit three together.” You may find that, once learned, this is a faster way to do the stitch.

Suppose you want a double de­crease gently slanting to the left? The traditional way: “slip one stitch as if to knit. Knit two together. Pass the slipped stitch over the k2-tog.” The Walkerized decrease is very similar to ssk: “Slip one knitwise. Slip two as if to k2-tog. Insert left hand needle into the front of the three slipped stitches and knit them all together.” 

Instead of having three mo­tions, one to slip an old stitch, one to pull a new stitch through, and one to pass a slipped stitch over, you now have two: slip stitches, and pull the yarn through.

Notice a pattern? The basic idea is to perform all of the slipping of stitches first, lining them up, then pull the new stitch through. Try this for a central dou­ble decrease: “Slip two as if to k2-tog, slip one knitwise, then insert l. h. needle into all 3 stitches and knit them together.”


[1]this straightens out the two stitches so that they don’t knit crossed.

[2]this motion is the mirror-image of “slipping two stitches as if to k2-tog,” which is used when you want to make a central two stitch decrease.
Reblog this post [with Zemanta]

Entrelac diagrams

For the last year, I've been experimenting with entrelac knitting. I find diagrams to be a good way to think about and explore entrelac knitting.

In this post, I'll show how to read my diagrams, assuming you already know how to do entrelac. I'll start with the simplest diagram and build from there.

Here's the minimal diagram to describe a piece of knitting:


The line inside the rectangle represents the grain of knitting. It's sometimes hard to tell the beginning edge from the ending edge of a piece of knitting—especially if the piece was cast off with a sewn cast-off—but with a flat piece, you can always tell which edges are selvedges.

These two diagram elements, rectangle and line, are enough to show the gist of an example of entrelac knitting:


The basic technique of entrelac is to join pieces of knitting end-to-side and side-to-end.

Looking at knitting, especially if it's stockinette, garter, or reverse stockinette, it's not always easy to see the direction of knitting. With entrelac, you're joining many little pieces of knitting as you go, so it's important to keep track of the direction of knitting. I use an arrow to show the direction:


Another thing to keep track of is which side the knitting starts and ends on. I use dots to show this. The diagram below shows a piece of stockinette knitting that starts and ends on a right-side row (when it's knit in the conventional direction):


The one below starts on a wrong-side row and ends on a right-side row:


Now I'll show an entrelac diagram with dots and arrows:


This is the minimal diagram to show how an entrelac piece is knitted. I suppose the dots can be inferred from the arrows, but they make following the diagram a little easier.

To make it clearer, for each square I'll often add a number in place of the dot that indicates how the first row begins, like so:


From the diagram above, you can infer how to work each square:
  • Start on a wrong-side and end on a wrong-side row: 1, 2, 7, 12, 13.
  • Start on a wrong-side and end on a right-side row: 3, 8.
  • Start on a right-side and end on a right-side row: 4, 5, 9, 10.
  • Start on a right-side and end on a wrong-side row: 6, 11.

Now, all this assumes that you know how to join entrelac squares.  In a subsequent post, I'll write about different ways to join entrelac pieces.

Thursday, February 04, 2010

Medusa Hat

On the needles now, I am forty-one squares into a hat that looks a lot like a bunch of coiled snakes. I'm not sure what it will look like when it's blocked and put on an actual head (probably mine), but right now... I better look at it through a mirror, like Perseus.

Medusa hat (41 squares) "right side"
Related Posts Plugin for WordPress, Blogger...